Calendar User Guide
Photo Calendars and Cards User Guide
Upon launching Treasure-Book Calendars and Cards, you will be offered five options:
- Open Saved file – either a calendar or a card project
- New Calendar – create a new calendar project
- New Card – create a new cards project
- Fast Track – a guided semi-automated process to create a calendar or cards project
- Cancel – Quit
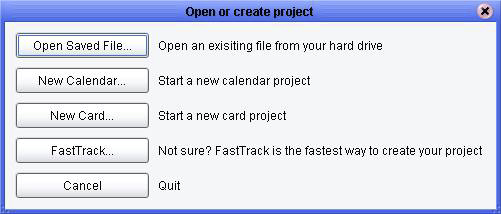
Select the option that fits your need. The next window that opens depends on the selection you make here.
Note: If you would like to create cards and calendars quickly and with amazing ease, why not give our new Fast Track feature a try.
Upon selecting New Calendar… from the “Open or Create Project” dialog, a template creation screen will come up.
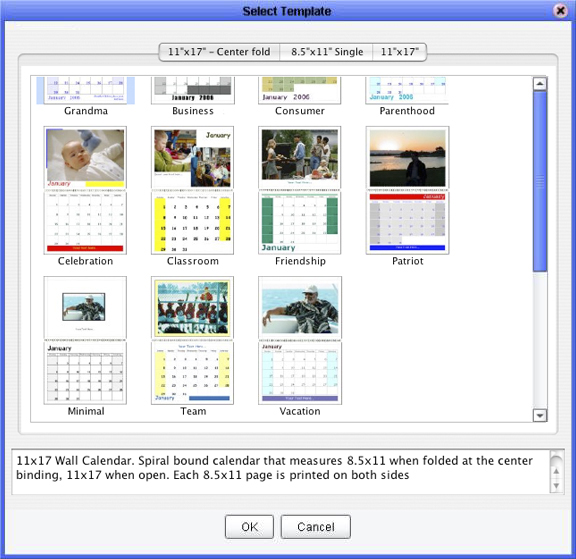
Select the desired template by double-clicking on it or by selecting it and pressing the OK button. Each Calendar starts with a template, though once selected, you can customized almost any visual aspect of the calendar.
Please note: Treasure-Book Inc. printing services currently prints only 11″ x 17″ (flat or center bound) and 8.5″ x 11″ size. Select one of the aforementioned size templates.
Make sure to select the right template size! You can change the template at any point during the design process – just be sure to confirm that your new template is in harmony with the design scheme you have already set. If it isn’t, you can always modify your design scheme to fit new template.
Calendar measures 11″ x 17″ when open, 8.5″ x 11″ when folded at the center binding. Each 8.5″ x 11″ page is printed on both sides. (full bleed printing supported).
Each 11″ x 17″ page is single-side printed and bound at the top. (full bleed printing supported)
Each 8.5″ x 11″ page is single-side printed and bound at the top.
Each 8.5″ x 11″ page is single-side printed and bound at the top.
After double clicking (or clicking OK), you will be presented with a calendar customization screen:
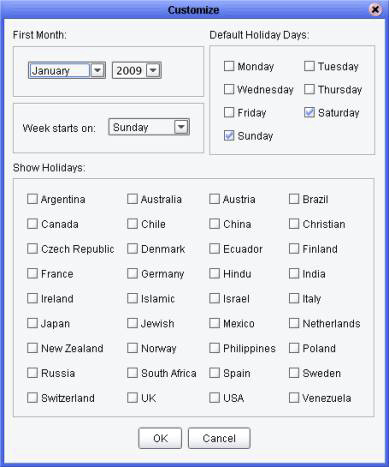
Here you specify a starting month and year, a week start day, as well as the set of holidays that you would like to have printed on your calendar. Note: You can always come back later and modify any of these selections.
After clicking OK, the calendar main project screen will open with the first month displayed:
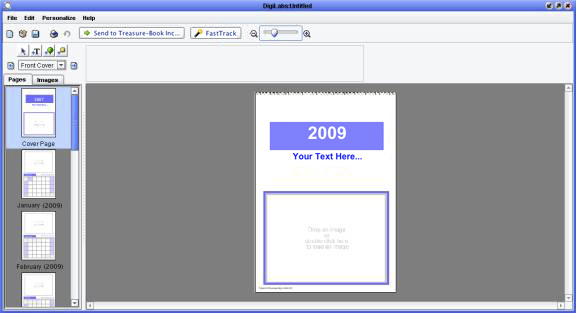
There are two ways to move from front cover to last calendar month. The fastest way is to use the forward/backward arrows in the Management Control Center located at the upper left-hand corner just under the toolbar.

Click the right/left arrow buttons will change the calendar page displayed on-screen. You can also use the drop-down arrow to display a list of calendar pages from which to choose.
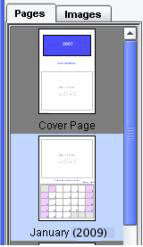
The second way to move from month to month is by using the navigation column located along the left side of the screen. Here you have a thumbnail view of each calendar page. Just click a month and the month will appear on-screen.
An assortment of customization options is right at your fingertips, allowing you to:
- Add images
- Add graphics elements
- Add text
- Add and edit cell contents
Each of these options allows customization in a variety of ways:
Images – The quickest to add the digital photos that you would like to have appear on your calendar is to simply drag them from your desktop and onto each month. You can also drag them to the images tab of the navigation column (just below the Management Control Center) to use later (you also have the option of using the Add Image Folder buttons located on the images tab). And of course, you have the option of using the Menu to add pictures (Personalize/Add New Picture…) as well.
Once have added the image, you can now manipulate it in a variety of ways. First click the image to select it. The Image Management Control appears:

Using the Management Controls (located to the right of the Management Control Center), once you selected the image you can:
- Add borders to an image
- Rotate an image. Don’t worry about making mistakes here – the “reset rotation” button will always undo any undesired rotation of an image.
- Round the corners of an image
- Fade an image
- Crop an image. A cropping box will appear over your image. Resize the image as you’d like and click the outside of the cropped area to complete the cropping.
- Resize an image to fill the page
Graphic Objects – You can add a square/rectangle object to customize your design scheme. Just create or select an existing object and the Object Management Controls appear:

Select objects:
- Can have their borders adjusted
- Can have their fill adjusted
- Can have their borders rounded
Text – You can add text to your calendar and customize it in all of the standard way. Using the Text Management Controls, additional customization becomes available.

You can:
- Add borders and fill
- Round the corners of borders and/or fill
- Rotate text. Don’t worry about making mistakes here – the “reset rotation” button will always undo undesired rotation of text.
Cell Contents – Every aspect of the actual calendar grid can be customized: text, images (you can drag an image to any spot on the grid), cell shape – even the grid itself! Click on any text on the calendar grid and the following Cell Management Controls appear:

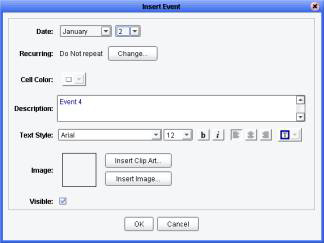
Events can be added & edited to the day cells by using the Personalize/Events menu items or by double-clicking on a day cell. You also have the option of adding clip-art:
That’s really all there is to designing a calendar. If it seems all too complicated don’t worry; this version of Treasure-Book My Calendars and Cards includes Fast Track, our new speedy calendar and cards creation tool. There are still some things left to discuss, such as what to do with your calendar after you’ve finished the design process. We’ll get to that, but first we will discuss some basics. Fell free to skip ahead if you come upon information that you already know.
As with all software applications, Treasure-Book My Calendar and Cards had fairly standard Toolbar and menu arrangements, as well as aspects that are unique to this application. For the sake of brevity, we will discuss in detail only those toolbar buttons items and menus commands that are unique to Treasure-Book My Calendar and Cards.

Send to Treasure-Book Inc. – This will send your calendar project to our facilities for professional printing and finishing. When printing at Treasure-Book Inc., your calendar will be printed on high quality paper. We use the latest in digital printing technology to produce professional quality results. The calendar will be bound and shipped to your address within a few days, hassle free.
New
- New Calendar Project… This will start a new calendar project.
- New Greeting Cards Projects… This will open a new cards Project (more about this in the Cards section)
Send to Treasure-Book Inc: – This will send your calendar project to our facilities for professional printing and finishing. When printing at Treasure-Book Inc., your calendar will be printed on high quality paper. We use the latest in digital printing technology to produce professional quality results. The calendar will be bound and shipped to your address within a few days, hassle free.
Preflight/Preview: This will check to see if your calendar photos are of adequate resolution. Photos whose resolution is considered to be low (less than 300 DPI) will be listed on a resolution status screen that will come up. This screen will only come up if at least one photo has a resolution below 300 DPI.
Global Font Change: This allows you to change the font, size, color and style of all calendar text at once.
Layout: This allows you to re-order the elements on the page (photos, graphics objects, text). The options are Bring Forward, Bring to Front, Send Backward and Send to Back.
Grid: Define the grid. This allows you to place a (non-printing) grid over the calendar to help facilitate the design process.
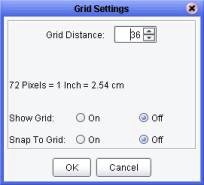
Show Grid: Display the design grid as an overlay on the calendar
Snap to Grid: This will cause dragged images, objects and text to align with the nearest grid line. Great for achieving uniform alignment of multiple objects.
Select Template: This brings up the selection screen, on which you have the option to switch from your currently selected calendar template.Note: if you decide to switch templates mid or post design, please carefully review your calendar to be sure that your design scheme and new template choice are in harmony with each other.
Calendar and Holidays: This will bring up a screen where you can specify a starting month and year, a week start day, as well as the set of holidays that you would like to have appeared on your printed calendar.
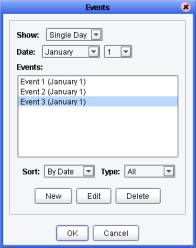
Events: This brings up the Events Management screen where you can edit and delete existing events.
Insert Events: This will bring up the Insert Events screen where new events (with images & clip-art included) can be easily added to your calendar.

Note: You can not delete predefined events (such as national holidays). If you do not want an event appear on your calendar, use the “Visible” checkbox to hide it. You can also go back to the Calendar & Holiday customization screen (Personalize/Calendar & Holidays) and remove an entire set of holidays.
Insert Month Thumbnail: This allows you to add a thumbnail size calendar to a previous, current, or next calendar month – or any combination of these. These can be added to specific months or to all months at one time. You can also resize the month thumbnail, an they can be dragged to any location on the calendar page. Even more modifications are possible using the Month Thumbnail Settings screen (just double-click on the thumbnail to bring up). Below are the menu items that you will see under insert Month Thumbnail:
- Add to All Months
- Previous Month
- Current Month
- Next Month
Calendar Look: The Lock/Unlock Date Grid allows you to fix the calendar grid in place, or allow it to be moved around on the page.
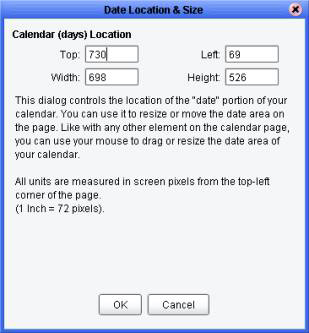
Date Location: This allows you to set the location and size of the date cells as they appear on your calendar with pinpoint accuracy. Note: You can also use the mouse to relocate and resize the date cells. To enable dragging and resizing using the mouse:
- Click-select the date grid
- Click the “Unlock Date Grid” icon in the Cell Management Controls. You will now be able to move and resize the date grid manually. Be sure to lock the date grid (by clicking the “Lock Date Grid” icon) when you are finished.
Changing the data location will change the date location on all pages!
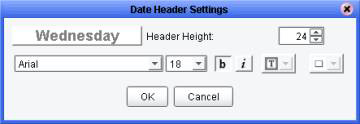
Days Header: This allows you to change the size and style of the day of the week headers.
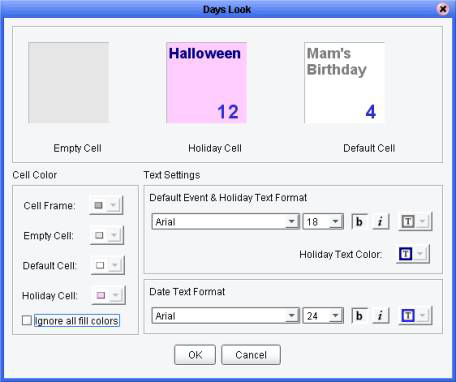
Color and Fonts: This allows you to change the color scheme, font size and style for Empty, Holiday, and Default calendar days cells.
Days Contents: This allows you to customize the location of every aspect of the date cell contents. Just left- mouse button click and relocate any of the various cell aspects for every cell on you calendar at once.
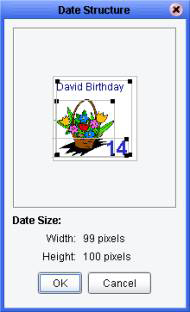
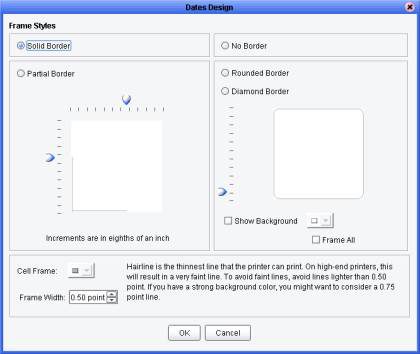
Date Style: This allows you to customize the date cell border & background color and shape (round corners or diamond shaped, in addition to the default square shape). Note: The terms “border” and “frame” are used interchangeably with regards to calendar projects.
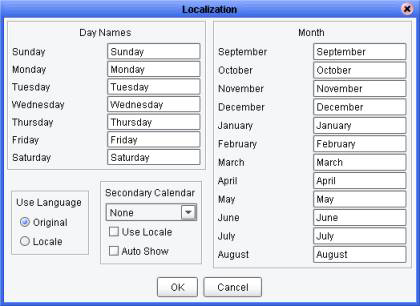
Localize: This allows you to set the language of static calendar elements to the language of your choice as long as the language is supported by you computer’s operating system.
Add New Picture: This bring up an Open File dialog from which you can select an image. Acceptable image files types are: JPEG, TIFF, BMP, PNG, and GIF.
Replace Selected Picture: This allow you to change the previous chose image for a new one. It will bring up the Open File dialog from which you can select an image. Acceptable image files types are: JPEG, TIFF, BMP, PNG, and GIF.
Insert Object
- Picture: This bring up an Open Dialog from which you can select a image. Acceptable image files types are: JPEG, TIFF, BMP, PNG, and GIF.
- Text: This adds a text object (default text:”Your text here…”) to your calendar page. Please see the Text Management Controls section above for information on editing text.
- Graphic Object: This adds a graphic object (default: square, frame only) to your calendar page. Please see Object Management Controls section above for information on customizing graphic objects.
- Clip Art: This bring up a clip art selection dialog from where you have the option of choosing from an array of clip art images. The clip art that you selected will be added to your calendar page, and can be resized and relocated.
Image Commands
- Load Picture: This allows you to replace a selected image or clip art object with an image from your computer. Acceptable image files types are: JPEG, TIFF, BMP, PNG, and GIF.
- Resize Picture to Fill: This allows you to enlarge a selected image or clip art object so that it fills the entire calendar page, side-to-side & top to bottom.
Placing the mouse over an object – or anywhere on the calendar page – and clicking the right-mouse button will bring up a context sensitive menu. This menu will include those commands that are relevant to the object/area. These menu commands have the same functionality as the like commands previously described. They also include Cut, Copy, Paste, Delete and Duplicate as applicable.
You can move any object on the page by selecting the arrow cursor in the Management Control Center, clicking the left- mouse button over the object, and dragging. You can resize a graphic object by selecting it, and placing the mouse at the border or corner of the object until the cursor becomes a resizing tool. For example:

Note: Pictures may also be resized, but they always retain their original width/height proportion regardless of how large or small they appear on screen.
Upon selecting New Card from the “Open or Create Project” dialog, a card size/style selection screen will come up. To begin creating a set of cards, a size/style must be specified. Once this is done, nearly every visual aspect of the cards can be customized to suit your needs.
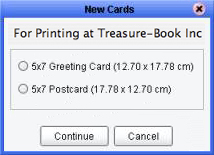
Make sure to select the right card size! You can change a card size/style at any point during the customization process, but doing so may create problems with the design scheme you have been working on. Select the desired card size/style and click the “Continue” button.
Treasure-Book My Calendars and Cards allows you to create two different types of cards: Postcards and Folding Greeting Cards. The card image that appears in the main application window will reflect the type of card you have chosen.
Postcards have two sides: Front and back. To switch between the sides, use the “Front” & “Back” button at the left of the window, or simply click the desired side in the Pages column (directly under the “Front & “Back” buttons).
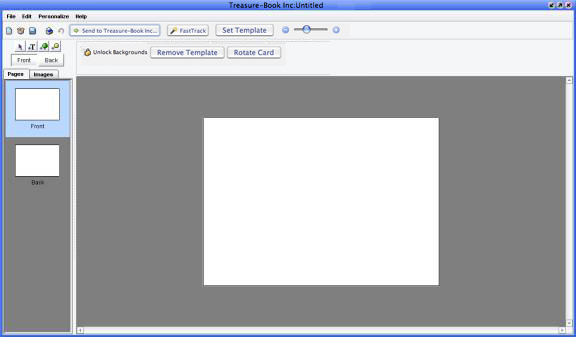 A Folding Greeting Card has three sides: front, back and card inside. To switch between sides, use the “Front, Back, and Card Inside button at the left of the window, or simply click the desired side on the Pages column (directly under the Front, Back, and Card Inside buttons).
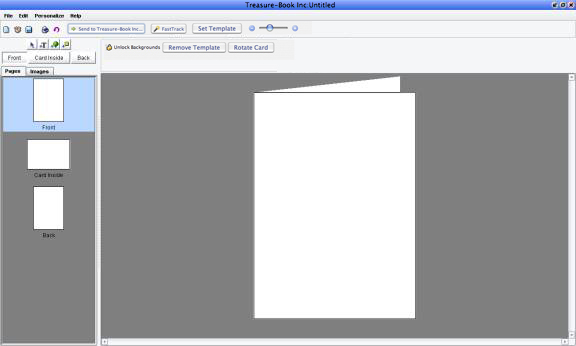
An assorted of customization options is right at your finger tips, allowing you to:
- Add images
- Add graphic elements
- Add text
Each of these options allows customization in a variety of ways:
Images – The quickest way to add digital photo or photos that you would like have appeared on you r card is to simply dragged them from your desktop and onto your card. You can also dragged them to the images tab of the Navigation Column (just below the Management Control Center at the left of the window) to use later (you also have the option of using the Navigation Column Add Image & Add Folder buttons located on the image tab). And of course, you have the option of using the Menu to add pictures (Personalize/Add New Picture) as well.
Once have added an image, You can manipulate it in a variety of ways. First click the image to select it. The Image Management Controls appear:

To the image you can now:
- Add borders to the image
- Rotate the image. Don’t worry about making mistakes here – the reset rotation button will always undo any undesired rotation of an image
- Round corners of an image
- Fade the image
- Crop the image. A cropping box will appear over your image. Resize it as you want and click outside of the cropped area to complete the cropping
- Resize the image to fill the page
Graphic Objects – You can add a square/rectangular object to customize your design scheme. Just select an object and the Objects Management Controls appears:

Selected objects can have their borders adjusted, their fill adjusted and have their borders rounded.
Text – You can add text to your card and customize it in all of the standard ways. Using the Text Management Controls, additional customizations become available.

You can add borders and fill, round the corner of a border and/or fill, and rotate text.
To enhance your card with that special add touch, try adding a template. A template is a frame or border that you can apply to your cards. We furnish you with a wide range of templates for nearly every occasion.
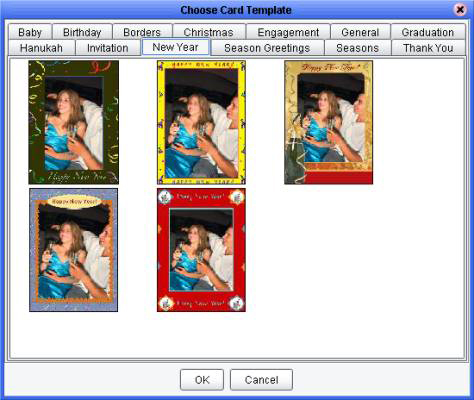
To apply a template to a card (and over an image), first access the card template by using the Personalize> Set Card Template menu command form the main application window.
- Select a template frame from any of the thirteen available categories
- Import the image you whish to place in the frame (you may do this before template selection as well)
- Resize the image however you want. Note: At this point, the image is above the frame
- Send the image behind the frame by using the “Edit->Layout” menu (also available by right-mouse-click- button clicking)
And that’s it! Your image is now framed and your card looks great! If your results are not to your liking – maybe the template style doesn’t fit the image style, for example – you can always go back to the Personalize>Set Card Template menu to change the templates, or click the “Remove Template” button if you do not want to use a template at all (for now).
Just when you thought creating that creating calendars & cards couldn’t get any easier! Treasure-Book My Calendar and Cards has a new feature called FastTrack that virtually automates the design process. FastTrack guides you all the way along, so that in no time, your calendar or cards projects is ready to print!
To use FastTrack to create calendars or cards, begin by clicking the “FastTrack” button on the “Open or create project” dialog:
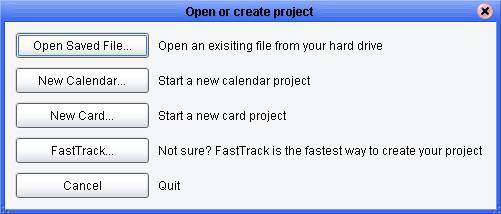
Next, you will be prompted to select a calendar or cards project:

From this point on, the FastTrack process will proceed with slight variations, depending whether you choose to create calendars or cards. For example, let’s say you decide to create a calendar project. This is the dialog that will now come up.
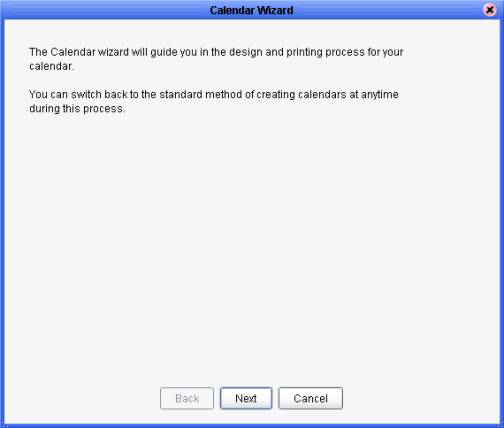
After you click “Next” you will see the following dialog:
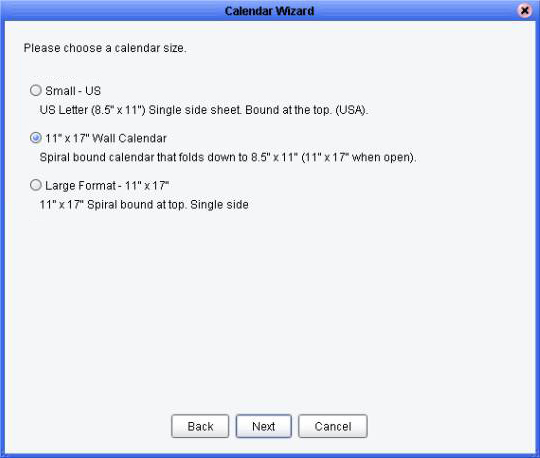
Select the size that suit your needs and click “Next”:
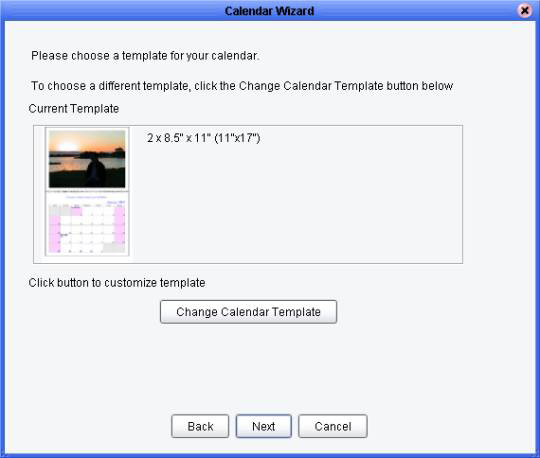
Now it is time to select a design scheme, or “template” for your calendar. Click “Change Calendar Template” to see your options:

The templates are divided by calendar size, through only the relevant tab (the calendar size you had previously selected) will be available at this time. A description of your selected calendar size will appear in the box at the bottom of the dialog. Once you find the template that suits your needs, click “OK”. Remember: you can always use the “Back” button to select different printing options.
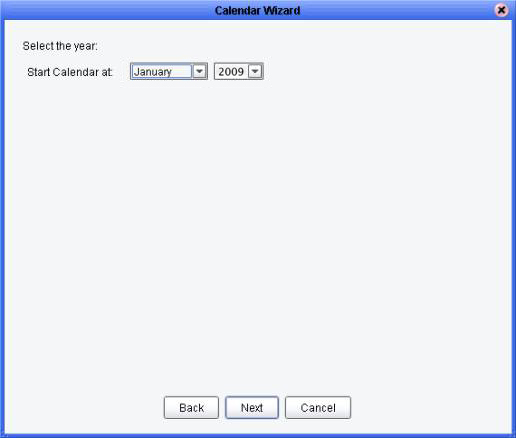
Click “Next”. Here you will select a year and starting month for your calendar:
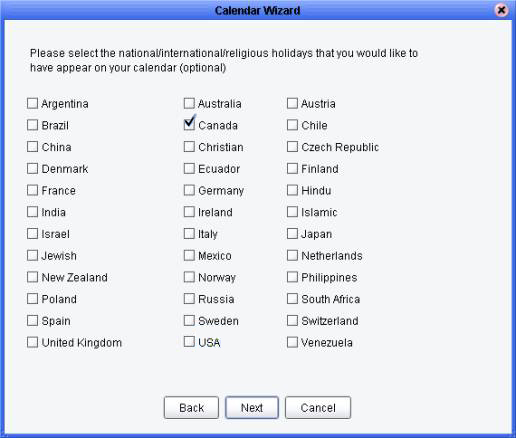
Next select a national holiday set or sets that you would like to have appear on your calendar:
Next you will be prompted to add images to your calendar:
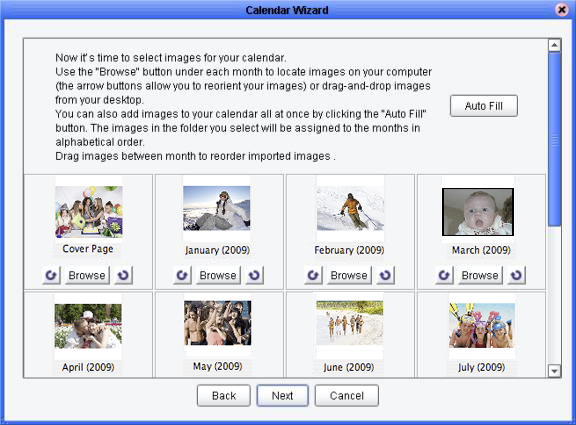
You can add images one-by-one to some or all months, or use the “Auto Fill” option to add the contents of a folder of images. You can also choose to add images later. Once you’ve finished here, click “Next”:
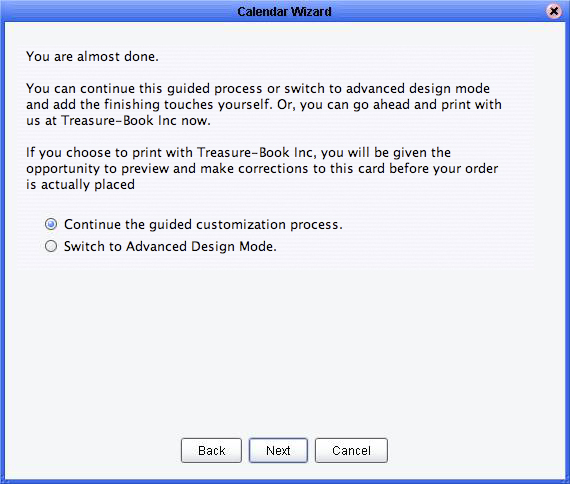
Here you have the option to:
- Send this calendar to print immediately
- Switch out of the automated design mode
- Continue in the automated design mode
Let’s say you decide to continue in the automated design mode:
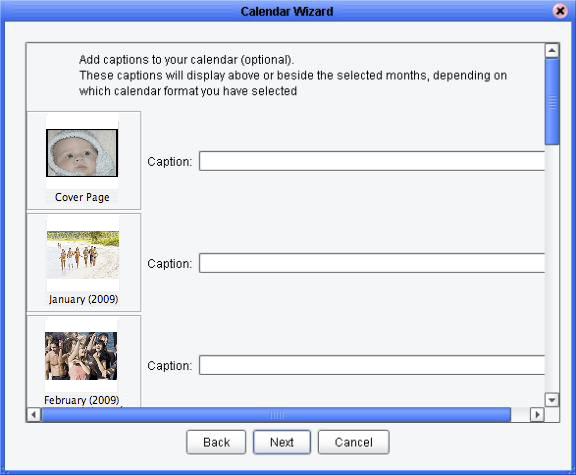
Here you can add captions to each of your months. You can add images now even if you have opted to add images later. Click “Next”:
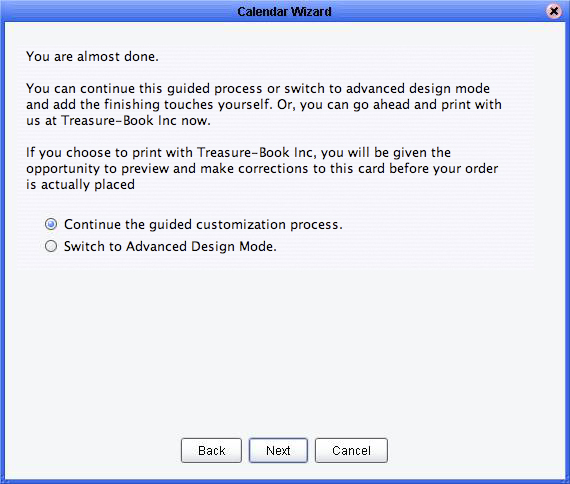
Again you have the option to:
- Send this calendar to print immediately
- Switch out of the automated design mode
- Continue in the automated design mode
Let’s say you decide to continue in the automated design mode:
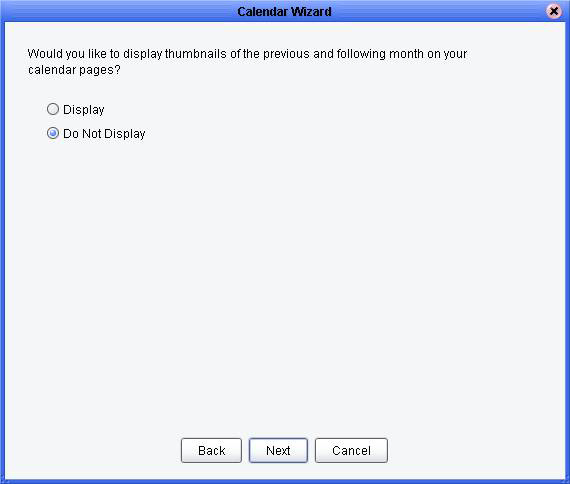
Here, you can choose to display thumbnails of previews/following months on your calendar pages. Click “Next”:
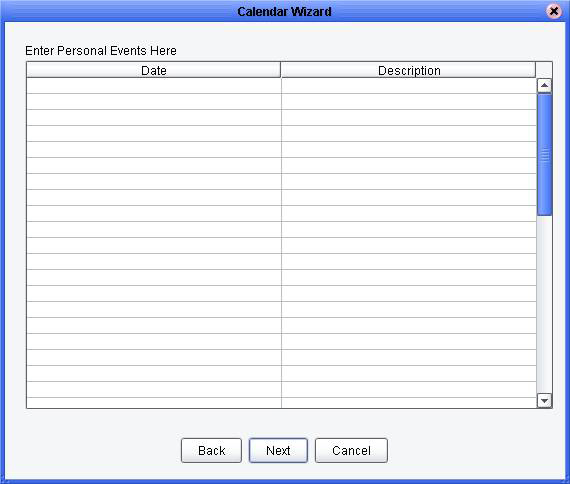
Here you can add personal events to your calendar all at once. REMEMBER, you can always add events later. Click “Next”
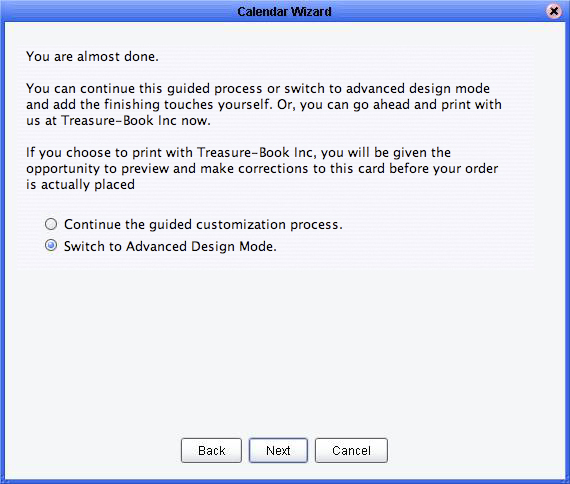
Now, you have two options:
- Print immediately with the Treasure-Book printing service
- Switch to Advance Design Mode (i.e. manual mode)
The FastTrack process for cards is similar to that of calendars, the key difference being a cropping tool that is available when you select the image that will appear on your cards:
Sending your project to print at Treasure-Book Printers Inc.
Treasure-Book offers high quality professional printing of your calendars and cards. Using Treasure-Boook’s professional printing service provides you with the following benefits:
- Your cards will be professionally cut and scored. The available stock sizes include those not supported by standard printers
- Your calendars and cards will be printed on high-quality stock, accentuating the beauty of your photos
- We use only the latest in digital printing technology. Your calendars and cards will have the look & feel of professional offset printing
- Your calendars and cards will be shipped to you quickly, and hassle free!
- Print as many copies as desire – the effort on your part never increases, though the cost per copy decreases as the number of ordered copies rises
- You’ll save money – just add up the cost of high quality paper, ink and binders and see for yourself. You’ll be getting professional, high-quality results, while saving money
Printing with Treasure-Book couldn’t be easier, so why not go and give a try! Your order is not complete until you approve it, so there’s no risk. To print at Treasure-Book, you will need to connect to the internet and have a browser. To begin:
- Under the file menu, select the send to print at Treasure-Book Inc. menu item, or click the send to Treasure-Book button located on the main window toolbar.
- The software will lead you to the process of creating, uploading and ordering your calendar & cards.
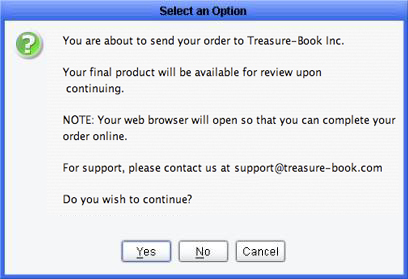
- The system will process your calendar and prepare it for editing. When this is done, the system will need to upload your calendar to our Treasure-Book inc. server to print
- You are now ready to upload the file to our Treasure-Book inc. server. You will need to be connected to the web to perform this upload. You will get the following dialog box:
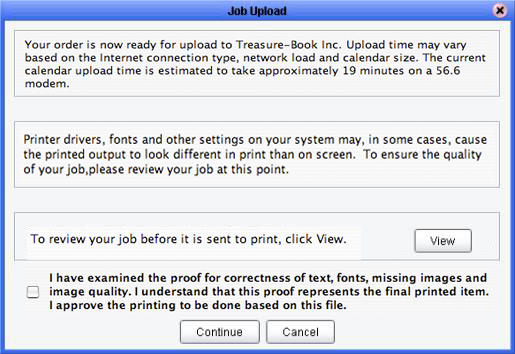
Choose “View” to view the project file as it will be sent to print in a PDF format. It is highly recommended that you proof your project at this stage. Check for typographical errors, fonts used, missing or low quality images, or any element that may not be displayed properly on the page ― anything that does not look right. Especially please check if the background images run over the bleed area. Can you see the crop marks? This is very important, because when cutting the pages, the images need to bleed outside of the cropmarks. How your calendar or card appears in the PDF file is how it will appear when printed as well. You will need Adobe Acrobat Viewer to view the file. Select the ”Get Acrobat” button to download it from the web. Choose “Continue” to start the upload process. If you wish to correct anything in your calendar project, click “Cancel,” then simply go back to your project and fix what needs fixing, and repeat this process again.
Once the upload is complete, your web browser will launch to our web site.
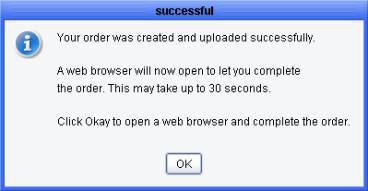
Here you will provide information about the order, such as the quantity desired, the shipping address, and the preferred shipping method. You will approve the cost, provide billing information, and finally, approve the purchase.
When dealing with digital images and digital printing, the main question is “Will my printed image look exactly as it does on my computer monitor?” The answer is “Close, but not exactly.” There are some small differences between computer generated images and printed images.
Scanners and digital cameras create images using combinations of just three colors: Red, Green and Blue (or “RGB”). These are the colors that computers use to display images on you computer screen. Printing presses, on the other hand, print full color pictures using a different set of colors: Cyan (blue), Magenta (red), Yellow and Black (or “CMYK”). So, before printing can commence, your RGB images will be translated to CMYK. There are RGB colors that cannot be created with CMYK — such colors are said to be “out of the CMYK color gamut.” These colors cannot be reproduced in print exactly, but are approximated as close as possible to their RGB cousins.
You are not likely to notice this kind of color shift in a color photograph. The exception would be an image that has very rich, vibrant colors — in this case a difference may or may not be noticeable. However the image looks, it will appear spectacular when compared to the same page printed on an inkjet printer.
The captured digital image is built out of pixels. The amount of pixels used to create the image is known as the image DPI (or Dots Per Inch). Traditionally, Images are displayed on a computer screen using a 72-96 dot-per-inch metric (or screen DPI). Printing allows for better image resolution (Printer DPI). Printers can get a resolution of anywhere from 300 to 1200 DPI. However, printer technology is different than screen technology, and printers differ one from another. As color is created on the page by applying a combination of 4 colors (CMYK) per dot, the actual DPI depends also on the printer technology being used (i.e. Inkjet, Toner, Ink) and the color space. When printing, the printer will take the original image and stretch it over the printer space. In other words, if you have a 72 DPI image and you print it on a 300 DPI printer, an inch will still be an inch — the 72 image DPI will be used to fill in the 300 Printer DPI.
It is always better to start with higher DPI. As a rule of thumb, a 150 DPI image should print fairly well, while a 300 DPI image should look just as good as a traditional photograph. Keep in mind that most people will not be able to tell the difference between 150 DPI and 300 DPI unless they examine the image from close up and are looking for discrepancies.
If your images are of sufficient quality (300 dpi is the gold standard) and moderate compression, your images should turn out very nicely. If your images are low quality or too compressed, the results will be inferior. However, keep in mind that too much is not always better. A 4”x6” 300 DPI non-compressed image and a 200 DPI JPEG compressed image will probably produce similar results such that most people will not be able to see a difference between them.
Printers cannot print all the way to the edge of a sheet of paper, so to create that effect, the printer must use a printing area larger than the actual document size. The printer prints beyond the edge of the document size (usually 1/8” of an inch beyond) and then cuts the paper down to the actual document size. The overprinting is called “bleed.’ Treasure-Books’ 11”x17 and 8.5”x11” Calendars and all sizes of Cards do bleed. If you want an image to go all the way to the end of the paper, the image should bleed 1/8” off the page.
If you need support during your production of your books or calendars or cards, please do not hesitate to contact us at: 1-877-513-8261 or e-mail us at: support@treasure-book.com and we will guide you through the problems you might have.
If you want the best there is then your choice must be Treasure Books in Surrey British Columbia... [Read More]
I just wanted to thank you and your partner for making the most amazing books! The quality is unb... [Read More]
Good evening
I have received my book from you today and I can say with all honesty that th... [Read More]
I want to let you know that I recently received my summer photo book projects and I LOVE, LOVE, L... [Read More]
I've ordered 2 photo books so far and they are amazing!! I have ordered different products on-lin... [Read More]
I received my printed book yesterday. I am very happy with my book made with Creativ... [Read More]
Lethbridge, AB
I have just finished putting together a new album for a family friend. We have been so pleased wi... [Read More]
When I received my photo book today I was amazed with the result. WOW was I impressed! I used Tre... [Read More]
When I'm preparing gift books to be sent by C-level executives, I need to be confident that the f... [Read More]
A heartfelt thank you for todays effort's - you are a such Superstars! THANK YOU SO MUCH!!!! We r... [Read More]
The book came yesterday and I was going to send you an e-mail in the evening, but time got away f... [Read More]
After receipt of the books: I was very pleased with the book. When I showed it to my coworkers th... [Read More]
As a wedding photographer I include digital photobooks in my packages. I was looking for another ... [Read More]
Photos by Cheryl
I just finished a 20 pages book this weekend and submitted the file to your company. I'm really l... [Read More]
I have received the new copy of my book today and once again I wish to thank you very much for yo... [Read More]
I am sending this e-mail to thank you for your quick response to my order.
Although I real... [Read More]
You've just got yourself a new customer! Like I said, this is my first attempt at photobook, I've... [Read More]
You ship to China, you are able to give personalized service, like double-checking my order and u... [Read More]
I was super happy with my first photobook so I decided to order more books from you. Good printin... [Read More]
Pipe & Punty Glassworks
We are very, very pleased with the book, so very impressed. I brought it to the high school where... [Read More]
My volume 1 arrived today and I am impressed! WOW, what a great job! You people are good! I'll be... [Read More]
I just received the ... [Read More]
I had so much fun making my photo book for my husband for our 10 year anniversary. The website’... [Read More]
I really enjoyed using this site! I loved the creativity it allowed and the variety of options fo... [Read More]
My books arrived today, just as you said they would - and they're even better than I imagined! I ... [Read More]
Treasure Book is miles ahead of the competition!
Not only do they provide a superior produ... [Read More]
Just wanted to say thank-you very much for the superb yearbooks your company printed for our scho... [Read More]
Reach for the Stars Montessori
Treasure Books saved me! I did up a retirement photo book for a long-time staff member and sent i... [Read More]
I wish to send my sincere thanks for the excellent job you and your colleagues did on my photo bo... [Read More]
As photographers, one of our big hurdles was finding a product that could effectively relay the q... [Read More]
Latte Productions Photography

