Photobooks Tips
Photo Books Tips & Tricks
- Book Monitor
- Two-Page Spread
- Adjusting and cropping your pictures
- Black & White and Sepia Filters, Fading
- Aligning Pictures
- Removing & Duplicating Frames/Pictures
- Designing Pages in Adobe Photoshop®
Book Monitor
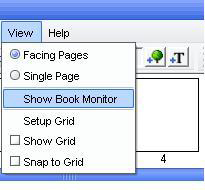
Using the Book Monitor Feature, you can see issues that arise in your photo book in real-time. By default, the Book Monitor is set to on. If the Book Monitor has been turn off, go to the view menu and click “Show Book Monitor”.
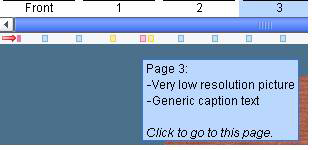
A new bar will appear underneath the photo book pages scrollbar. I everything is 100% fine with your book, the bar will be blank. If however, there are issues with any page, color-coded boxes will appear for those pages with errors.
The color of the arrow indicates the most serious of the problems within the book. Placing the cursor over a coded-color error box will display a page’s problems, and allow you to go directly to the page to make changes.
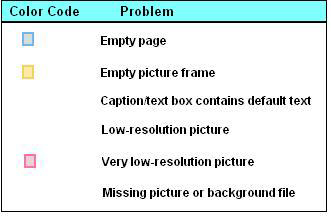
Multiple problems on a single page with the same color-code will be presented by a single box of the pertinent color
Two-Page Spreads
Any of your picture can be used as a background for a two-page spread. Just drag a picture from the Image Browser to a page (but not onto the frame), and when asked “Would your picture to be used as a background for a single page, or across a two-page spread?” click the Two-Page Spread button.
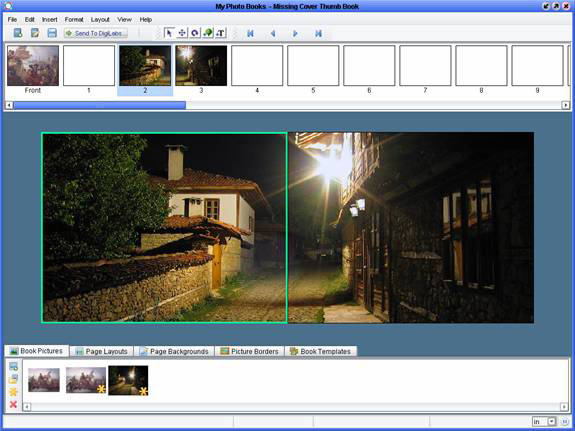
Note: when using a landscape picture for a two-page spread background, it’s often best to use a portrait orientation book. Also, faces should be kept out of the gutter, as some of their fine details may be lost or distorted within the spine.
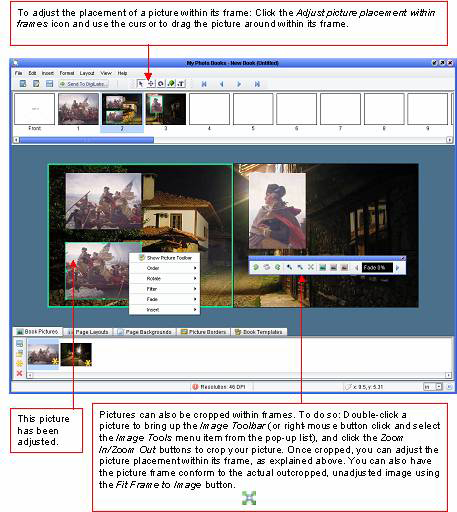
Adjusting & Cropping your pictures
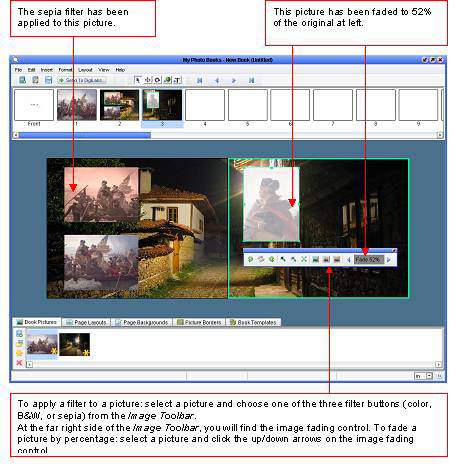
Black & White and Sepia filters, fading
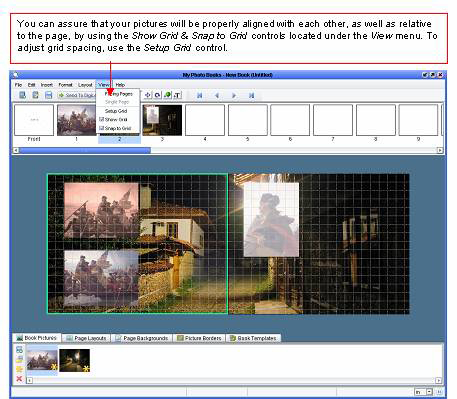
Aligning pictures
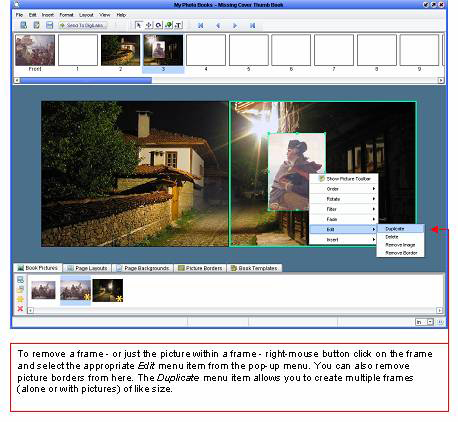
Removing & Duplicating frames/pictures
Designing pages in Adobe Photoshop®
If you plan to design some or all your pages in Adobe Photoshop®, There are a few things you need to know:
Bleed: when one or more sides of a printed image touch the edge of the paper, the use of bleed guarantees that the finish (cropped) page will look neat and precise. The page bleed allowance should be 1/8 inch at all four sides of the page. The bleed are (i.e. beyond the crop marks) will be trimmed off. If you use a background color or image, it should cover the entire page including the bleed area. For example, if your printed page is 8.5 inch wide, your page design should be 8.75 inch wide with the bleed (1/8″ + 8.5″ + 1/8″).When you move an image in the page layout, the trim line, coloured in red, and the grid will show up and it allows you to place the image away from the trim line.
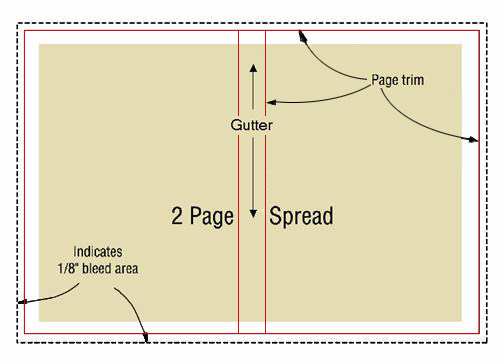
Two-Page Spread: this is a page design that spans both right and left-hand pages. The pages are centered at the gutter where they are bound into the spine. Approximately 1/4″ of the spread will be bound into (and thus hidden within) the spine. This, in of itself, is not a problem, but it does require a bit of special attention when using an external tool, such as Adobe Photoshop® to create page design.
- Be sure to leave bleed at all sides. The Treasure-Book My Photo Books software will automatically adjust any background used as if it has bleed designed into it.
- Keep important design details at least 1/8″ form all sides of the page (1/4″ is even better) so that unwelcome trimming does not occur.
- Keep important design details an extra 1/4″ away form the center binding (this is in addition to the bleed you leave on all 4 sides of the page). This is an issue specifically for single page designs.
- The software will adjust the spread pages for the 1/4″ lost within the spine. To this end, the spread should be designed to be 1/4″ smaller than the size that it would be if you were to include the gutter. Also, Keep in mind that although page spreads are well suited for panoramic pictures backgrounds, fine details may be partially obscure within the binding.
If you want the best there is then your choice must be Treasure Books in Surrey British Columbia... [Read More]
I just wanted to thank you and your partner for making the most amazing books! The quality is unb... [Read More]
Good evening
I have received my book from you today and I can say with all honesty that th... [Read More]
I want to let you know that I recently received my summer photo book projects and I LOVE, LOVE, L... [Read More]
I've ordered 2 photo books so far and they are amazing!! I have ordered different products on-lin... [Read More]
I received my printed book yesterday. I am very happy with my book made with Creativ... [Read More]
Lethbridge, AB
I have just finished putting together a new album for a family friend. We have been so pleased wi... [Read More]
When I received my photo book today I was amazed with the result. WOW was I impressed! I used Tre... [Read More]
When I'm preparing gift books to be sent by C-level executives, I need to be confident that the f... [Read More]
A heartfelt thank you for todays effort's - you are a such Superstars! THANK YOU SO MUCH!!!! We r... [Read More]
The book came yesterday and I was going to send you an e-mail in the evening, but time got away f... [Read More]
After receipt of the books: I was very pleased with the book. When I showed it to my coworkers th... [Read More]
As a wedding photographer I include digital photobooks in my packages. I was looking for another ... [Read More]
Photos by Cheryl
I just finished a 20 pages book this weekend and submitted the file to your company. I'm really l... [Read More]
I have received the new copy of my book today and once again I wish to thank you very much for yo... [Read More]
I am sending this e-mail to thank you for your quick response to my order.
Although I real... [Read More]
You've just got yourself a new customer! Like I said, this is my first attempt at photobook, I've... [Read More]
You ship to China, you are able to give personalized service, like double-checking my order and u... [Read More]
I was super happy with my first photobook so I decided to order more books from you. Good printin... [Read More]
Pipe & Punty Glassworks
We are very, very pleased with the book, so very impressed. I brought it to the high school where... [Read More]
My volume 1 arrived today and I am impressed! WOW, what a great job! You people are good! I'll be... [Read More]
I just received the ... [Read More]
I had so much fun making my photo book for my husband for our 10 year anniversary. The website’... [Read More]
I really enjoyed using this site! I loved the creativity it allowed and the variety of options fo... [Read More]
My books arrived today, just as you said they would - and they're even better than I imagined! I ... [Read More]
Treasure Book is miles ahead of the competition!
Not only do they provide a superior produ... [Read More]
Just wanted to say thank-you very much for the superb yearbooks your company printed for our scho... [Read More]
Reach for the Stars Montessori
Treasure Books saved me! I did up a retirement photo book for a long-time staff member and sent i... [Read More]
I wish to send my sincere thanks for the excellent job you and your colleagues did on my photo bo... [Read More]
As photographers, one of our big hurdles was finding a product that could effectively relay the q... [Read More]
Latte Productions Photography

